
Salads
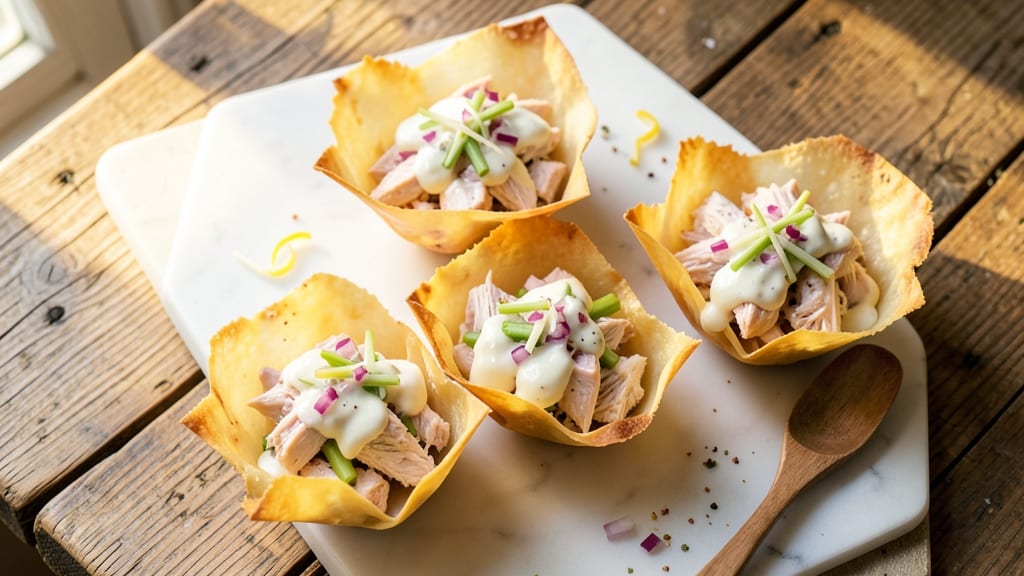
This chicken salad in phyllo cups recipe delivers the perfect balance of crispy edges and creamy centers—transforming a classic dish into elegant, handheld bites. The secret lies in layering tender shredded chicken with a rich, creamy dressing, then encasing it in delicate phyllo cups for a restaurant-worthy presentation.
Whether serving for a brunch spread or a sophisticated appetizer, these cups are designed to impress with minimal effort.
The filling combines juicy chicken, crisp vegetables, and a velvety dressing that stays creamy without turning greasy—a common challenge in phyllo-based dishes. Meanwhile, the phyllo cups achieve crispy perfection through a precise baking technique that ensures they hold their shape while delivering that satisfying crunch.
This method eliminates the need for fussy assembly, making it accessible even for beginners.
What you’ll end up with is a dish that’s as visually stunning as it is delicious—golden, flaky phyllo cups filled with a creamy chicken salad that holds together beautifully. The contrast of textures and temperatures (warm phyllo meeting cool filling) makes every bite unforgettable.
Plus, the recipe scales effortlessly, so you can prepare a single platter for two or feed a crowd without stress.
Serve these cups with a drizzle of your favorite sauce or a sprinkle of fresh herbs for an extra touch of elegance. The best part? They stay fresh in the fridge for up to 24 hours, making them perfect for meal prep or last-minute entertaining.
Let’s get started on this showstopper dish!
Ingredients for chicken salad in phyllo cups
These ingredients bring together crispy phyllo cups and creamy chicken filling for an unforgettable appetizer.
| Ingredient | Amount | Notes |
|---|---|---|
| Cooked Chicken Breast 🍗 | 1 ½ lb | Shredded or finely chopped |
| Phyllo Dough Sheets 🍞 | 12 sheets | Thawed if frozen |
| Mayonnaise 🥛 | ½ cup | Full-fat for creamy texture |
| Greek Yogurt 🧀 | ¼ cup | Plain, full-fat preferred |
| Red Onion 🧅 | ½ cup | Finely diced, small variety |
| Celery Stems 🥬 | ½ cup | Finely chopped, fresh |
| Fresh Dill 🌿 | ¼ cup | Chopped, or dried at 1 tbsp |
| Lemon Juice 🍋 | 2 tbsp | Freshly squeezed |
| Dijon Mustard 🍯 | 1 tbsp | For tangy depth |
| Salt 🧂 | ½ tsp | Diamond Crystal preferred |
| Black Pepper 🌶️ | ¼ tsp | Freshly ground |
| Olive Oil 🫒 | 2 tbsp | For brushing phyllo |
| Butter 🧈 | 2 tbsp | Melted, for crispiness |
Phyllo is the star here—Filio brand or the store-bought kind from the freezer section works perfectly. Thaw it overnight in the fridge, then keep it covered with a damp towel to prevent drying. Trader Joe's often carries pre-thawed phyllo if you're in a rush, but it's pricier. The chicken should be cooked just right—overcooked shreds turn dry, so poach or bake until juicy. For extra crispiness, brush the phyllo with melted butter instead of just olive oil. That golden edge is everything!
No fresh dill? Dried works at one-third the amount, but you'll lose some brightness. Subbing Greek yogurt for mayo? Use full-fat—low-fat versions can make the filling too dry. For the onion, yellow or red both work, but red adds a touch of color. Celery can be swapped for green onions if you're in a pinch, though the texture differs slightly. The lemon juice is non-negotiable—it keeps the filling fresh-tasting. If you're making these ahead, add the lemon right before serving to prevent sogginess.
Phyllo cups stay crispy for 24 hours if stored properly—keep them in an airtight container at room temperature. For longer storage, freeze them unfilled for up to 1 month. Assemble the filling just before baking to maintain that perfect texture contrast. These reheat beautifully—5 minutes at 350°F brings back the crispy edges. Double the batch and freeze extras; they're perfect for last-minute entertaining.
Why You'll Love This Recipe
- No-Fuss Assembly: I swear by this recipe because it’s the kind of meal where you can prep while chatting with guests—or just scrolling through your phone. Just shred the chicken, mix in the mayo and yogurt, fold in that sharp red onion, and let the phyllo do the heavy lifting. Honestly, it’s the kind of dish that makes you feel like a host even when you’re exhausted.
- Creamy Crispy Magic: That contrast of flaky phyllo with the cool, herby chicken salad? It’s the best kind of bite—crisp on the outside, creamy on the inside, and the Greek yogurt keeps it light without sacrificing richness. I’ll be real: my kids fight over these, and that’s saying something.
- Party in a Cup: These are my go-to for potlucks, lunchboxes, or when I need to feed a crowd without stress. They’re easy to grab, look impressive, and you can even make them ahead—they hold up better than most finger foods. Plus, no one expects you to serve them on a tray; just pop them on a plate and let people eat with their hands.
- Budget-Friendly Luxe: You’d think phyllo makes this fancy, but it’s actually a smart way to stretch ingredients. A single pack of phyllo turns basic chicken salad into something special, and the yogurt cuts costs while keeping it creamy. Between us, I’ve made these for under $1.50 per serving—and they still feel like a treat.
Step-by-step instructions for chicken salad in phyllo cups
Here's how to create golden, crispy phyllo cups filled with rich, creamy chicken salad.
👨🍳 Step 1: Prepare the Chicken Salad Filling
In a large bowl, combine the 1.5 lb cooked chicken breast with the 0.5 cup mayonnaise, 0.25 cup Greek yogurt, 1 tbsp Dijon mustard, and 2 tbsp lemon juice. Mix well until fully incorporated—this is where the creamy magic begins.
Next, add the 0.5 cup finely diced red onion, 0.5 cup chopped celery stems, and 0.25 cup chopped fresh dill. Season with 0.5 tsp salt and 0.25 tsp black pepper. Gently fold everything together until evenly distributed. The mixture should be thick but still spoonable—if it's too dry, add a splash of mayonnaise to loosen it up. Taste and adjust seasoning if needed; this is your flavor foundation.
🥘 Step 2: Assemble and Fill the Phyllo Cups
Preheat your oven to 375°F to ensure the phyllo gets perfectly crispy. Lay out 12 sheets of phyllo dough on a clean surface, covering them with a slightly damp towel to prevent drying. Working with one sheet at a time, brush lightly with 2 tbsp olive oil—just enough to keep it pliable without making it soggy.
Fold each phyllo sheet in half diagonally to form a triangle, then fold it in half again to create a smaller triangle. Spoon about 2 tablespoons of chicken salad into the center of each folded triangle. Fold the sides inward to form a cup shape, then fold the bottom up to seal completely. Place each assembled cup seam-side down on a parchment-lined baking sheet.
🔥 Step 3: Bake to Golden Perfection
Brush the tops of the phyllo cups with melted butter—this is the secret to achieving that irresistible crispy exterior. Bake for 12-15 minutes until the edges turn golden brown and the phyllo is crisp throughout. Watch closely after 10 minutes—the phyllo cooks quickly and can burn if left too long.
Once golden and crisp, remove from the oven and let cool for 2-3 minutes before serving. The filling will stay warm and creamy while the phyllo maintains its perfect crunch. Serve immediately for the best texture contrast—creamy centers with crispy, flaky shells.
⏰ Step 4: Optional Final Touches
For an extra burst of flavor, sprinkle with additional chopped fresh dill or a drizzle of lemon juice before serving. These finishing touches elevate the dish from delicious to extraordinary. Store any leftovers in an airtight container, but I promise they won't last that long—they're too tempting!
Pro Tips For Making Chicken Salad In Phyllo Cups
- Brush Phyllo Fast: Keep a small bowl of melted butter (or olive oil) right next to your workstation—not the stove—and use a pastry brush to coat each sheet immediately after stacking. I learned this the hard way: phyllo dries out in seconds, and nothing ruins a crispy cup like soggy layers. Two quick swipes per sheet, then fold—no waiting.
- Dice Onion Like Pro: Thinly slice the red onion first, then cut those slices into matchstick-thin strips (about 1/8-inch wide) before adding to the salad. Whole chunks or big dice? They’ll turn your phyllo cups into a water balloon. I was skeptical until I tried it—now it’s non-negotiable.
- Chill Chicken First: Let the cooked chicken cool completely before shredding or chopping—at least 20 minutes, or pop it in the fridge for 10. Warm chicken makes the mayo/yogurt dressing sweat, turning your salad into a greasy mess. Trust me, your phyllo cups will thank you later.
- Press Cups Firm: When shaping the phyllo cups, don’t just fold—press the edges of each sheet into the muffin tin with your thumb or a spoon to seal them. This stops leaks (yes, they happen) and ensures the cups hold their shape when you fill them. I skip this when I’m lazy, and the results are always sloppy.
Common mistakes when making this recipe
Overfilling the Cups
Phyllo is delicate, and overfilling will cause the cups to burst open during baking. I’ve seen this happen when people pack in too much chicken salad—stick to 2 tablespoons per cup. The filling should be snug but not bulging.
If your mixture is too thick, add a splash of mayonnaise to loosen it up before assembling. Trust me, the crispy shell is what makes these cups special, and overfilling ruins that magic. 💫
Skipping the Butter Brush
The butter brush isn’t just for flavor—it’s essential for crispiness. I’ve tried making these without it, and the phyllo turns out soft and chewy instead of perfectly crisp. Brush the melted butter evenly over the tops after assembling, and don’t skip it!
The butter also adds a subtle richness that pairs beautifully with the creamy filling. If you’re short on time, a mix of olive oil and butter works too.
Not Preheating the Oven
A cold oven means uneven cooking and soggy phyllo. Always preheat to 375°F for at least 10 minutes before baking. I’ve seen beginners rush this step, and the results are disappointing—phyllo needs that hot start to crisp up properly.
If your oven runs hot, reduce the temperature slightly to 350°F and keep a close eye on them after 10 minutes to avoid burning.
Using Dry Chicken
Dry, overcooked chicken will turn your creamy filling into a dry, crumbly mess. Poach or bake your chicken until it’s juicy and tender—it should shred easily with a fork.
If your chicken is dry, try adding a splash of chicken broth or Greek yogurt to the filling to restore moisture. The filling should hold its shape but still be creamy, not grainy.
Assembling Without Damp Towels
Phyllo dries out fast, and dry phyllo cracks or tears when folding. Keep your unused sheets covered with a slightly damp towel while working. I’ve made this mistake more than once—don’t!
The towel prevents the phyllo from becoming brittle. If you’re working ahead, store the phyllo in an airtight container with a damp paper towel inside to keep it pliable. 🌟
Baking Too Long
Phyllo cooks in a flash, and once it’s golden, it’s done. Overbaking turns the cups into crispy shells with a dry, papery texture. Watch them closely after 10 minutes—they’re ready when the edges are golden brown and the phyllo is firm to the touch.
Remove them immediately to lock in that perfect crunch. If you’re unsure, err on the side of underbaking; you can always put them back in for a few more seconds if needed.
Nutrition facts
Frequently asked questions
Can I make these phyllo cups ahead of time?
Yes! Assemble the phyllo cups with filling and refrigerate them for up to 24 hours before baking. For best results, bake them fresh from the fridge—just add 2-3 extra minutes to the baking time. The filling stays creamy while the phyllo maintains its crispy texture. Pro tip: Store unfilled phyllo cups in the freezer for up to 1 month for a quick assembly later.
What if I don't have phyllo dough?
You can substitute with puff pastry sheets or even thinly rolled pie crust for a similar effect. Puff pastry will give you a flakier texture, while pie crust stays slightly softer. For a lighter version, try won ton wrappers baked at 400°F for 8-10 minutes. The flavor won't be identical, but it works in a pinch!
How do I keep the filling from leaking?
Seal the phyllo cups tightly by folding the sides inward first, then folding the bottom up completely. Press gently around the edges to create a strong seal. For extra security, brush the folded edges with a tiny bit of egg wash before baking. The filling should stay put if the cups are properly sealed—just avoid overfilling, which is the #1 cause of leaks.
Can I use rotisserie chicken for this recipe?
Rotisserie chicken works perfectly—just shred it finely and remove any skin or bones. For extra flavor, mix in 1 teaspoon of chicken seasoning or a splash of chicken broth to the filling. The key is using juicy, tender chicken—overcooked rotisserie pieces can make the filling dry. If needed, add a spoonful of Greek yogurt to restore creaminess.
What are the best ways to serve these cups?
These phyllo cups shine as appetizers, but they also work beautifully as a main course for brunch or light lunches. Pair them with a cool cucumber salad, warm pita bread, or a drizzle of spicy aioli. For a festive touch, arrange them on a platter with fresh dill sprigs or lemon wedges. They're also perfect for potlucks—just pack them in a single layer to prevent crushing.